Audi A4: Radiator/Radiator Fan
Overview - Radiator/Radiator Fan
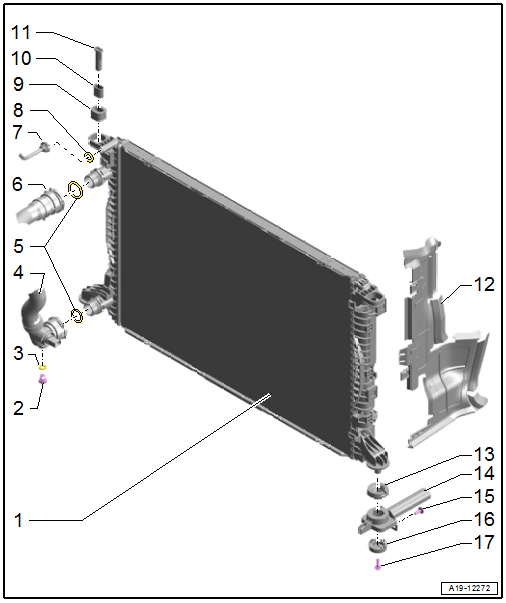
1 - Radiator
- Removing and installing. Refer to → Chapter "Radiator, Removing and Installing".
- After replacing, replace entire amount of coolant
2 - Drain Plug
- 1.5 to 3 Nm
3 - O-ring
- Replace after removing
4 - Coolant Hose
- Lift the clamp to remove
- Connecting. Refer to → Fig. "Connect the Coolant Hose to the Connector Coupling".
5 - O-rings
- Replace after removing
6 - Coolant Hose
- Lift the clamp to remove
- Connecting. Refer to → Fig. "Connect the Coolant Hose to the Connector Coupling".
7 - Coolant Line
- To the coolant expansion tank
- To remove, press the release ring
- Connecting. Refer to → Fig. "Connect the Coolant Hose to the Connector Coupling".
8 - O-ring
- Replace after removing
9 - Rubber Bushing
- For the radiator
10 - Sleeve
11 - Retaining Pin
- Disengage and remove using the screwdriver
12 - Air Duct
13 - Rubber Bushing
- For the radiator
14 - Radiator Bracket
15 - Bolt
- 5 Nm
16 - Backing Plate
17 - Bolt
- 4.5 Nm
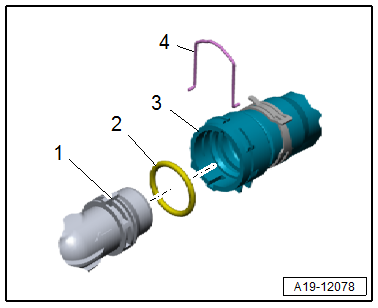
Connect the Coolant Hose to the Connector Coupling
 Note
Note
Replacing the damaged clip -4-.
- Remove the old O-ring -2- in the coolant hose -3-.
- Coat the new O-ring with coolant and insert it in the coolant hose.
- Press the coolant hose on to the coolant pipe -1- until it engages audibly.
- Press the coolant hose on again and pull to make sure the connector coupling is engaged correctly.
Fan Shroud and Radiator Fan
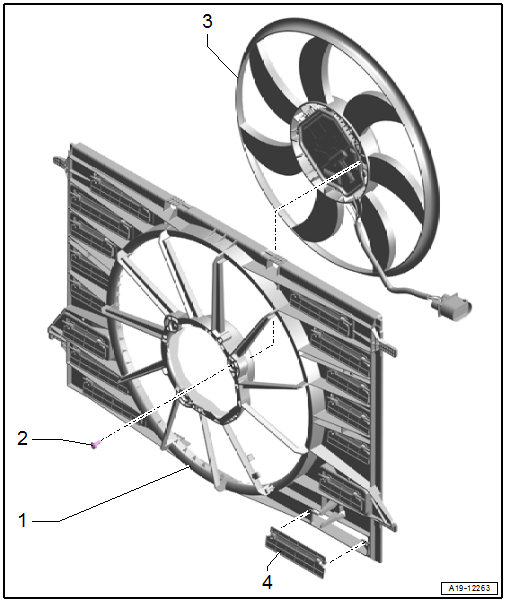
1 - Fan Shroud
- Removing and installing. Refer to → Chapter "Fan Shroud, Removing and Installing".
2 - Bolt
- 5 Nm
3 - Radiator Fan -V7-
- With Radiator Fan Control Module -J293-
- Removing and installing. Refer to → Chapter "Radiator Fan -V7-, Removing and Installing".
4 - Radiator Shutter
- There are different versions. Refer to the Parts Catalog.
READ NEXT:
 Radiator, Removing and Installing
Special tools and workshop equipment required
Coolant Collection System -VAS5014- or Shop Crane - Drip
Tray -VAS6208-
Elbow Assembly Tool -T10118-
Caution
This procedure contains mandato
Fan Shroud, Removing and Installing
Removing
- Remove the front noise insulation. Refer to
→ Body Exterior; Rep. Gr.66; Noise Insulation; Overview - Noise
Insulation.
- Remove the charge air cooler. Refer to
Turbocharger, G-Charger
Turbocharger
All procedures and components are described under:
→ Servicing - 4-Cylinder 2.0L 4V TFSI Engine; Rep. Gr.21; Turbocharger;
Turbocharger, Removing and Installing.
Charge
SEE MORE:
Multi Media Interface
Traffic safety information
Audi recommends only using certain Infotainment
system functions, such as entering a destination
or pairing a mobile device, while the vehicle
is stationary. Always be prepared to stop operating
the Infotainment system in the interest
of your safety and the safety of other
Sill Panel, Removing and Installing
Front Sill Panel Strip, Removing and Installing
Special tools and workshop equipment required
Trim Removal Wedge -3409-
Omega Clip Tool -T40280-
Removing
- Move the front seat all the way back.
- Remove the instrument panel side cover. Refer to
→ Chapter "Instrument Panel Side C
