Audi A4: Transmission, Transporting
Special tools and workshop equipment required
- Shop Crane -VAS6100-
- Lifting Tackle -3033-
- Hook And Support Tool -3311- with Hook And Support Tool - Bolt -3311/1-
- Retaining Strap -T40155-
 Caution
Risk of damaging the transmission by mixing ATF and transmission fluid (MTF) through the same bleeder.
- The transmission filled with ATF and MTF transmission fluid must be tilted a maximum of 15º in lateral and longitudinal direction.
- If more of an incline is needed, then the ATF and MTF transmission fluids must be drained.
- Draining the ATF. Refer to → Rep. Gr.34; ATF, Draining and Filling.
- Draining the transmission fluid. Refer to → Rep. Gr.34; Transmission Fluid, Draining and Filling.

- Secure the transmission on the Hook And Support Tool -3311- (use new longer bolts Hook And Support Tool - Bolt -3311/1-).

- Guide the Retaining Strap -T40155- around the transmission and secure on the Lifting Tackle -3033-.
- Secure the Retaining Strap -T40155- on the transmission end with a commercially available M10 bolt -arrow-.
- Using the Lifting Tackle -3033- and the Shop Crane -VAS6100- the transmission can be lifted and transported.

 Note
Note
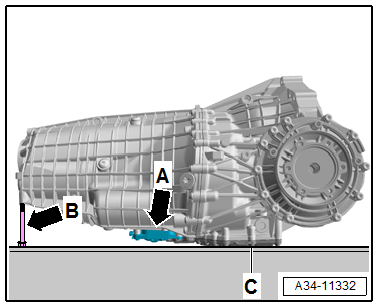
To prevent damaging the transmission fluid pump -A- when placing the transmission on the oil pan -C-, for support a commercially available M10 bolt approximately 100mm long -B- must be installed on the rear of the transmission housing.

Securing on Engine and Transmission Holder
Special tools and workshop equipment required
- Shop Crane -VAS6100-
- Engine and Gearbox Bracket -VAS6095A-
- Engine/Gearbox Support Shackle (2 pc.) -10-222A/12-
- Gearbox Support -T40206- and Gearbox Support - Drilling Template -T40206/3-
- Retaining Strap -T40155-
- Lifting Eyebolt -3368-
Procedure
- Assemble the Gearbox Support -T40206- as follows:
- The connection area -arrow A- points upward.
- The lettering "B" points upward -arrow B-.

- Place the Gearbox Support - Drilling Template -T40206/3- on the Gearbox Support - T40206-.
- Make an additional 12 mm hole -arrow- in the Gearbox Support -T40206-.

- Install the bolts as follows in the holes:
- M10x80 in the hole 15
- M10x120 in the hole 11
- M10x80 in the hole 7
- M10x50 in the new hole 5b
 Caution
Risk of damaging the transmission by mixing ATF and transmission fluid (MTF) through the same bleeder.
The ATF and transmission fluid must be drained.
- Draining the ATF. Refer to → Rep. Gr.34; ATF, Draining and Filling.
- Draining the transmission fluid. Refer to → Rep. Gr.34; Transmission Fluid, Draining and Filling.

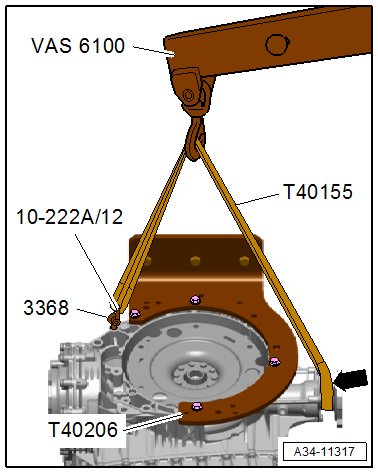
- Secure the Lifting Eyebolt -3368- with the Engine/Gearbox Support Shackle (2 pc.) -10-222A/12- on the transmission housing as shown.
- Secure the Retaining Strap -T40155- on the Engine/Gearbox Support Shackle (2 pc.) -10-222A/12- and on the left flange shaft -arrow-.
- Lift the transmission with the Shop Crane -VAS6100- and secure on the Gearbox Support -T40206- as shown.


